Wednesday, 25 April 2012
Make a typography face in photoshop
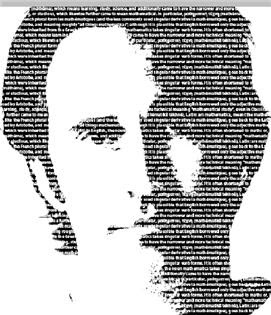
This a tutorial shows you how to give any normal face ia typography texture and this is the final result :

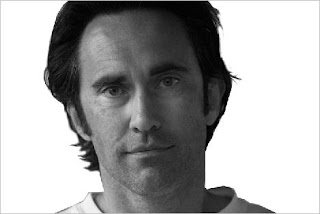 1-Open a photo of face then go to Image>Adjustments>Desaturate after that remove the background of the photo with any way you want for example with white brush:
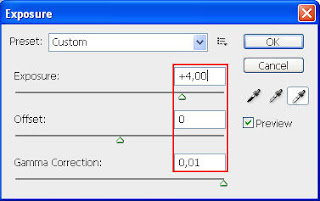 2-go to Image>Adjustments>Exposure then make the Gamma 0,01 and change the Exposure until you get the right format of the face
 like this:
 3-Now go to Filter>blur>Gaussian blur then :
 4-Now go to Select>Color Range... then click :
 5-Add
a text layer with this Settings: then fill the text layer with any text
(from Wikipedia for example) and make sure your text has no empty line
or to many escapes like this:
5-Add
a text layer with this Settings: then fill the text layer with any text
(from Wikipedia for example) and make sure your text has no empty line
or to many escapes like this:
 6-Now press Ctrl and click on the face layer to select the painted area of the layer
 7- Now select the text Layer then go to Layer>Layer_Mask>Reveal Selection .
 8-Now change the opacity of the face layer to 30% :
 9-Now go to Filter>Stylize>Wind then:
 10-Now select the text layer then go to Layer>Layer_Style>Drop_Shadow then:
 11-Now select Color Overly then:

 1-Open a photo of face then go to Image>Adjustments>Desaturate after that remove the background of the photo with any way you want for example with white brush:
*Now before next step duplicate the background layer then fill the bottom one with white then select the top one*
 2-go to Image>Adjustments>Exposure then make the Gamma 0,01 and change the Exposure until you get the right format of the face
  like this:


 7- Now select the text Layer then go to Layer>Layer_Mask>Reveal Selection .
 8-Now change the opacity of the face layer to 30% :
 9-Now go to Filter>Stylize>Wind then:
 10-Now select the text layer then go to Layer>Layer_Style>Drop_Shadow then:
 11-Now select Color Overly then:
Reference: http://www.photoshop99.com/2010/03/make-typography-face-in-photoshop.html
Subscribe to:
Post Comments (Atom)
Popular Posts
-
Follow these steps in Adobe Illustrator and Photoshop to create a range of vector shapes and graphics that can be combined into a great lo...
-
Today we’re going to learn how to create a super creative collage effect, using a range of photo manipulation, blending and compositional ...
-
Final Product What You'll Be Creating A few times a each month we revisit some of our reader’s favorite posts from t...
-
 This a tutorial shows you how to give any normal face ia typography texture and this is the final result :
 -
Follow this step by step post processing guide to give your photos a dark lomo style effect with high contrast, blue tones and vignette bu...
-
Follow this logo design process walkthrough to see the making of a cubist style logo design made up of lots of detailed vector facets. Not ...
-
Follow this Photoshop tutorial to create an awesome distorted type design. Using a range of Photoshop brushes we’ll create the appearance ...
-
’ve just finished up another little digital art experiment where I set out to build something cool and abstract out of Photoshop patterns ...
-
Posted by Tyler Bramer in Photoshop Tutorials on March 10th, 2009 After writing my previous tutorial here about...


0 comments:
Post a Comment